Payeezy to Clover Reference Guide
Clover is an all-inclusive tool that has been designed for the small business merchant. It will allow you to take transactions and as well as manage your business all from the Clover dashboard.
This Reference Guide provides a quick comparison of the functions you perform on Payeezy and how you can perform those same functions in the Clover application. This document is structured based on the functions offered via the Payeezy application Remote Payment Manager and outlines where and how to perform those same functions via the Clover dashboard. This document is not a comprehensive Clover user guide.
This document is structured in the follow key sections:
- Getting Started provides a quick overview of the first steps you would take when logging into Clover for the first time
- Getting Help informs you of the methods available to you to seek additional assistance
- The Clover Dashboard introduces the Clover dashboard
Further instructions on navigation and use of the Clover application are available via the following options:
- Pre-recorded webinars that can be viewed both prior to and after your upgrade is complete can be accessed from the FAQs
- Tutorials using Walk-Me technology are available from within the Clover application to assist you in performing some of the key actions you will take, such as accepting payments, managing employees and viewing reports
- Tour functionality located on the Reporting tab to help understand the reports
Users on Clover must have a valid email address that is unique to them and to which they have access. If you have a business domain, each user should be assigned their own email address and should not use a shared email address. In addition, each user should have a mobile number that is unique and accessible to them.
New users to Clover will receive an email welcoming them to Clover and enabling them to activate their Clover account.
Follow these instructions:
- Click on the Activate link provided in the welcome email you received from "Clover from Fiserv" with the subject line "Your Payeezy Account has been Upgraded to Clover - Activate your account right away" or go to https://www.clover.com/login and click "Access Your Account"
- Enter your email address
- When requested, set your password
- After setting your password you will be requested to enable two-factor authentication. Click on the "Enable" link and enter your cell phone number. This number should be a valid US, US-territory or Canadian number, associated with the user and to which the user always has access. A code will be sent via text to this number. Retrieve this code from your phone and enter it in.
- If you are the business owner, the Clover billing page will then be displayed and indicate that you have been boarded to the Clover SaaS plan, which is $0 per month. Accept the terms to complete boarding process.
- Upon successful account activation, you will land on the Clover dashboard and can immediately begin taking payments by clicking on the “New Sales” button in the upper lefthand corner. Important note for merchants upgraded to Clover prior to August 1: The Clover dashboard will be upgraded on August 1. If you were migrated to Clover prior to August first, you were boarded to Dashboard 2 and can begin taking payments by clicking on the green “Virtual Terminal” button. You will receive notification prior to your upgrade to Dashboard 3 (late 2023 or early 2024).
- You will be able to access your Clover account at any time via https://www.clover.com/login
Log in using your email address and the password you just created. When you log in you will arrive at the Home Screen, also known as the Clover Dashboard.
You are now ready to start taking payments and running your business!

If you have multiple MIDs tied to this account (email address) you will be able to access them all via a drop down in the upper left-hand corner of the Clover dashboard.
Note: you must activate each MID prior to being able to access it.
If a current Payeezy user/employee does not have a valid, unique email address on Payeezy, an account for that user will not be created in Clover. After the upgrade if there are users for whom Clover accounts were not created, you will need to create them in the Clover dashboard. See Managing Users/Employees to learn how to add or update employees
After reviewing the FAQs, this Resource Guide and the guidance provided from within the Clover application, if you still have questions, Clover offers additional ways in which you can seek assistance.
Click on the Help button on the upper right-hand side of your screen and select the desired option or go to clover.com/help.

- Select "Browse Help Center” which offers articles on several commonly browsed topics, as well as the ability to enter key words in the Search bar on the upper right-hand side of your screen.

- Select “Get Support” and select a topic on which you need assistance. You will then be able to start a chat session or request for someone from the Support Team to call you directly.
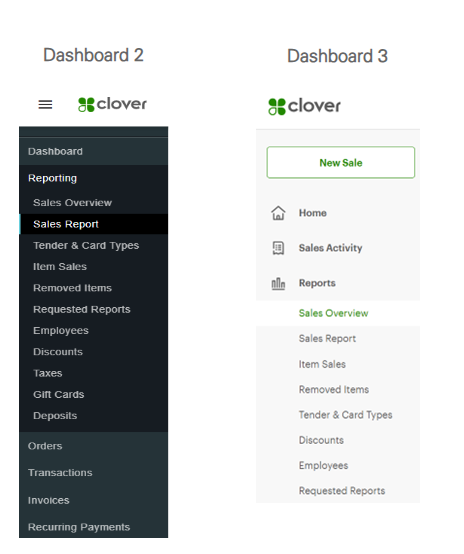
Both Payeezy and Clover allow you to navigate to various screens that allow you to take payments and run your business. Payeezy that has navigation with tabs that will always on the top of the page.

The Clover navigation links are down the left-hand side of the page. The tabs offered may vary based on your specific configuration.
Please note the following updates to the Clover dashboard: Clover is in the process of updating the dashboard from Dashboard 2 to Dashboard 3. The version you are on can be clearly determined by the dashboard displayed when you log into Clover.com. Please note that if you were boarded to Dashboard 2, you will be upgraded to Dashboard 3 in early Q1 2024 and will receive notification prior to the upgrade.
Dashboard 2:

Dashboard 3 – available for merchants migrated on or after August 1, 2023
| Payeezy Tab | Clover Link | Description |
| Home | Dashboard | Landing page. See Accepting and Viewing Transactions for more detail. |
| POS | Virtual Terminal | Allows you to enter a payment. See Entering a Manual Transaction for more detail. |
| Transactions | Dashboard 2: Transactions
Dashboard 3: Sales Activity > Transactions | Allows you to view and take additional actions (such as a refund) on previously processed transactions. See Viewing and Managing Transactions for more detail. |
| Reports | Reporting | Provides access to reporting. See Viewing Reports for more detail. |
| Recurring | Dashboard 2: Recurring Payments
Dashboard 3: Sales Activity > Recurring Payments | Allows you to create and manage recurring payment plans. See Managing Recurring Payments for more detail. |
| Payment Pages | Payeezy Payment Pages | Under construction, will mimic Payeezy |
| Administration | Account & Setup (Dashboard 2) Or Settings Gear on the upper right-hand side In Dashboard 3, some features are located under View all settings | Where you manage/configure your program (gateway information, fraud, etc.)
Note: Employee configuration on Dashboard 2 is located under Account & Setup. On Dashboard 3 it is located from the main menu on the lefthand side. |
Function | Payeezy | Clover |
Recent Activity | Provides a graphical depiction for the past week of
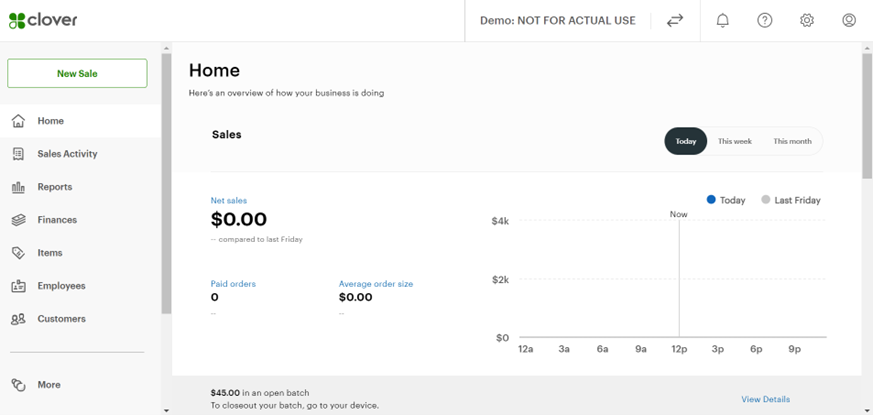
| The Clover Dashboard Page provides a summary of Today’s Net Sales. Included are
In addition, the Sales Overview report provides additional trending information
|
On Payeezy most merchants that own multiple businesses are configured to have separate login/user IDs for each business. Clover allows you to access multiple businesses with a single login/user id (email address). Once in Clover you must select the business you are working in prior to taking payments, viewing reports, or performing other functions within Clover. You can select the correct business from the drop down on the upper left-hand side of the Clover dashboard.
The POS tab on Payeezy allows you to enter a manual transaction.
On Clover you will enter manual transactions on the Virtual Terminal application (for Dashboard 2 users) or New Sale application (for Dashboard 3 users), which is accessible on the upper left-hand side of any Clover page. (If you do not see the Virtual Terminal or New Sales application, please check Employee permissions).
Dashboard 2

Dashboard 3
![]()
The following outlines the various Payeezy payment actions and how to take those actions in Clover.
Function | Payeezy | Clover |
Purchase and Pre-Authorization Transactions with a Credit Card | The POS page - Credit tab allows you to manually take a payment from a customer using their signature debit or credit card. Select Purchase or Pre-authorization from the Transaction Type drop down list and complete the following fields
Order Amount. If you are adding tax, the tax must be added into the purchase amount. Amount cannot exceed $999,999.99
Cardholder Name. Enter the Cardholder name. For stored cards, please see Using Card on File
Credit Card Number. This is a debit or credit card number.
Expiry Date (expiration date). This defaults to current month and year so you must remember to update if different
Optional Fields include
Select Process Transaction to submit the payment
Print or Email a receipt. Receipt will display and you are offered as an option once you process a transaction. .
| The Virtual Terminal tab (accessed via the Virtual Terminal application (Dashboard 2) or New Sales application (Dashboard 3) allows you to manually take a payment from a customer using their debit or credit card.
Select Take Payment or Pre-Authorization from the Transaction Type drop down list and complete the following fields
Subtotal. This is the amount without tax, tip or convenience fee. You can add convenience fee amounts separate from the purchase amount.
Amount cannot exceed $999,999.00
If you are configured to include an Invoice number, you will be prompted to add it. To enable inclusion of the invoice number, navigate to
Under the Payment Information section, enter the Cardholder name in Search customer or business name. You can also store merchant information such as name, email address, phone number. This allows tracking customer spend (lifetime value), marketing campaigns, loyalty, etc. For stored cards, please see Using Card on File
Card Number. This is a debit or credit card number. When using stored cards, the number will auto-populate.
Expiration Date. Enter the card expiration date
Note: to prevent fraud, Clover requires entry of the CVV and zip code field.
Optional Fields Include:
Print or Email a receipt. To email a customer receipt, in the Receipt delivery section, prior to completing the payment, you will be able to select email receipt or none. If you have not saved this customer previously, you will be prompted to enter a valid email address.
To automatically print a customer receipt after every transaction, go to
The receipt that will be printed or emailed will display when Complete Payment is selected. Select Done
To display the customer details on the receipt, you must first enable this feature on the Payment receipts page. This can be found under Account & Setup > Transactions on Dashboard 2 and under Settings on Dashboard 3.
The Clover generated Reference ID will display on the receipt. |
Void a Credit Card Transaction | You can void a transaction that has not yet been settled from the POS page or from the Transactions Page
Transactions can be voided until the next settlement cycle.
Select Submit Transaction The initial transaction will display as a Purchase and the Voided transaction will display as Tagged Void
Transactions can also be voided from the transaction details page | A transaction can only be Voided within 25 minutes of initiating the payment. After that time, a refund must be issued.
After selecting Complete Payment, the receipt will display with an option to Void the transaction. Select Void. Select Yes, Cancel Select Done
Transactions can also be voided from the Transactions details and select Refund (if within 25 minutes will be voided).
To Void a pre-authorization, search for the Transaction under Authorizations. Click on the three dots and select Void Authorization
Once voided, the transaction can be seen in the Voided transaction section, accessed via the Voids tab on the left-hand side of the Clover page.
Note: Transactions that were originated on Payeezy must be voided on Payeezy. |
Pre-Authorization Completion for a Credit Card Transaction | You can complete a pre-authorized transaction from the POS page or from the Transactions Page
| You can complete a pre-authorized transaction by searching for and locating the pre-authorized transaction under the Authorizations tab on the left-hand side of the Clover page.
Note: Completions for transactions that were pre-authorized on Payeezy, must be completed on Payeezy. |
Forced Post | Payeezy allows submission of force post transactions, which allows a merchant to push through a completion message without an original pre-authorization. | This is not supported on Clover. Due to additional security requirements by Clover, force post transactions are not supported. Transaction completions should be processed on the same system on which they were authorized. |
Purchase Transaction with a Check | The POS page – Check allows you to manually take a payment from a customer using a check.
| When entering a transaction select the Payment method “Banking account (ACH) and enter your checking account information.
Note that phone number and ID (e.g. license number) are required. |
Purchase transactions with a Credit Card via Quick Key | Quick key allowed merchants to enter several transactions at a time and submit them via batch file upload | Clover does not support batch upload |
Card on File functionality allows for storage of frequent customer credit card information to allow for quicker processing of transactions.
Payeezy Card on File | Clover Card on File |
Other than for recurring payments, Payeezy does not offer the ability to store cardholder information for frequent shoppers.
Merchants sometimes use the transaction search functionality to find a previous transaction and then use Re-Charge to initiate a new transaction.
| To create a new transaction from a previous transaction, select the transaction and use “Duplicate Transaction”.
It is recommended that merchants use the card on file functionality to enter payment transactions for a repeat customer and the recurring payments functionality to schedule ongoing payments. To add cardholder information, when entering Payment information via the Virtual Terminal screen, users will be offered the ability to add a new customer and save a card on file.
On the next transaction you can search and select the customer and the Payment information will be auto filled.
See Viewing and Managing Transactions for more information on searching for transactions. |
On Payeezy the Transaction tab allows you to view and manage transactions that were entered manually into the system by you/employee or submitted as an eCommerce transaction from your website. Functions you can perform on the Payeezy Transactions page include:
- Search for transactions
- Refund a transaction
- Complete a pre-authorized transaction
- Void a transaction
- Download transactions into a .csv file
On Clover Dashboard 2 select Transactions application from the menu on the left-hand side of any Clover page. On Clover Dashboard 3 the Transactions application is a sub-tab located under the Sales Activity application.
Function | Payeezy | Clover |
Basic Search Search by
Advanced Search adds the following additional search criteria:
|
Search by
You can further filter on
Clover also allows selection of Payments within a dollar amount range.
To locate a transaction for a specific customer name, search for a transaction using one of the available Clover search criteria, such as date range, and then do a standard search (CTRL-F on pc, COMMAND-F on Mac). |
Search Results
In both Payeezy and Clover the initial search will provide a summary of transactions based on the search results, with the ability to click on the transactions for more detailed data. You may need to scroll down to view the search results on the Clover screen. Payeezy offers the ability to enter follow-on activity, such as a refund, from the summary page. On Clover you will need to click on Details, where you will be able to enter follow-on activity.
Section Fields | Payeezy | Clover |
Summary |
|
Note: When Customer Reference Num is sent in the API, and if the transaction is a business card (level 2 or level 3) it maps to Order Number as a 12 character, left justified field and can be viewed in the dashboard under Purchasing Card section. A new field will be added to the Details page to display Customer Reference Number for all card types in the coming weeks. |
Details | The following additional fields are provided:
| Additional fields are provided within the following sections:
|
Payeezy | Clover |
After you complete a search, you can choose to refund a previously approved transaction.
You can also refund a transaction from the Details Page
| After you search transactions by clicking Transactions from the menu on the left-hand side, you can select the transaction by clicking on Details and then click Refund.
If the transaction was entered within the past 25 minutes, it will be processed as a void.
Note: Transactions that were originated on Payeezy must be refunded or voided on Payeezy.
|
Payeezy | Clover |
After you complete a search, you can choose to refund a previously approved pre-authorized transaction.
| Expand the Transactions tab in the menu on the left-hand side. Navigate to Authorizations. Any open authorizations that were initiated in the past 30 days will be displayed. Select the three dots on the right, and on the menu offered select “Complete Transaction”.
Note: Pre-authorizations that were originated on Payeezy and for which a completion was not issued prior to the upgrade must be completed on Payeezy.
|
Payeezy | Clover |
Select Print to create a PDF of the page displayed | Your browser can format the page for your printer |
Payeezy | Clover |
The Download CSV link allows an export of transactions from the resulting search to be exported to a .csv file | The Export Payments from This Page link allow export of transactions from the resulting search to be exported to a .csv file
|
Follow-on activity, which includes completions, refunds, voids and reversals, must be entered on the system in which the transaction was originated.
Example: You enter a payment for Mary via Payeezy on Monday. On Thursday you are upgraded to Clover. You will be able to view that transaction in Clover. The following week Mary comes in to return an item she purchased on Monday. When you find the transaction in Clover you will be unable to enter the refund. This will prompt you to log into Payeezy and enter the refund from Payeezy.
Recurring payment plans allow you to automatically bill customers at pre-determined intervals. Once the plan is created, you can add cardholder information directly to the plan. You can view processed payments as well as view and amend pending payments.
The following are the key differences between how the Payeezy payment plans work and how the Clover payment plans work:
- Payeezy allows you to upload plans from a file, Clover does not
- Payeezy allows you to create a pre-authorization plan, Clover does not
- Clover allows you to include a default tax amount, Payeezy does not
- Clover allows you to include a default tip amount, Payeezy does not
Creating Plans
Creation and management of recurring plans can be accessed from the following links:
- Payeezy: Recurring tab located in the top menu
- Clover Dashboard 2: Recurring payments app located in menu on the left-hand
- Clover Dashboard 3: Sales Activity -> Recurring payments app located in the menu on the left-hand
Function | Payeezy | Clover |
Create Plan | Select Create Plan from the left-hand list or from link above your current plan list
| Select Create New Payment Plan button
|
Filter Plans | You can filter for plans updated today, added today or queued | You can search by plan name and filter by frequency and status |
Activate or Suspend an existing Plan | Clicking the gear will change the status from active to suspended. gear will change the status from active to suspended.
Clicking the
Status can also be changed by selecting from the list of plans and clicking the ‘suspend’ or ‘activate’ link at the top of the menu | Select the Activate Plan checkbox to activate the plan.
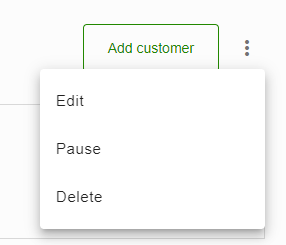
To delete or pause a plan, select from the three dots in the righthand side in either the summary page or details page.
|
Note: If you have a recurring plan that includes pre-authorizations, those plans will not be imported to Clover. These plans can be changed to payment plans on Payeezy prior to migration so that they can be imported to Clover.
Note: only active, valid plans or subscriptions will be migrated.
Note: Clover recurring plans will retry denied payments up to 5 times to best ensure you are able to collect the payment. If you find a previously successful card has been declined, you may want to contact the customer to ensure their card number has not expired or been cancelled.
Note: subscription amounts are migrated from Payeezy with the total amount, including fees. For example, if a payment on Payeezy was for $50.00 + $2.13 in fees, the total amount migrated to Clover is $52.13.
Scheduling and updating recurring payments
| Function | Payeezy | Clover |
Add Customers | Under the Recurring Payments tab, select a plan from the plan screen. Select Create Recurring Transaction, enter cardholder information and select Create. | There are two ways to add a customer to a plan.
The Payeezy fields Reference Number, Customer Reference Number and Refefence Number 3 will map to the Clover field “Note for Item or Service”. |
| Update Customers' scheduled payments | Select the plan in which the customer is active, select customer, and enter changes | From the Plan Details screen, click on the three dots to the right of the customer row and click on the Edit button
Note: you cannot edit a customer subscription within 3 days prior to the scheduled payment date, which is when the invoice is sent to the customer.
Note: if you want any of the payments within the subscription to be set up for a different amount or to be billed to a different card, you can either edit the subscription (must be prior to 72 hours before scheduled payments) or create a separate subscription for that differing amount.
Note: To change the payment date, you can delete the subscription from one plan and create a new subscription in another plan. |
Viewing Recurring Payments and Status of Customer Subscriptions in Clover
Viewing all plans
Navigate to Recurring Payments on the lefthand side (located under Sales Activity in Dashboard 3) to view a list of all plans. The Subtotal field will list the total amount of subscriptions that were initially created. It will not reflect subsequent changes to plan amounts. Note, for migrated Payeezy history, since there is no equivalent field in Payeezy, the Subtotal field will list as $1.00.
To export a list of all plans and the subscriptions (customers) within the plan click on the three dots next to “Create a New Plan” and select “Export”.
To determine whether a plan has processed, you can view the “Last Run” date.
View a summary of all payments and status for all customer subscriptions within a plan
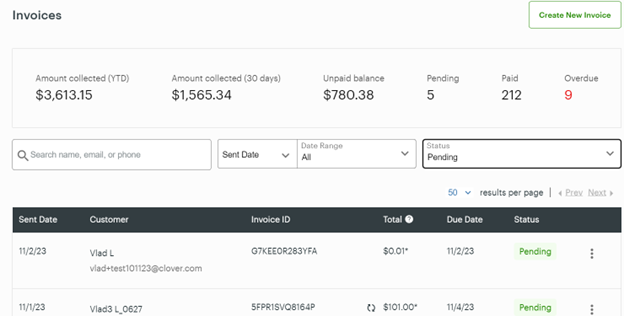
Click on the Invoices tab on the lefthand side (located under Sales Activity in Dashboard 3). Options include:
a. Search for a specific customer
b. Select Sent Date or Due Date
c. Select a Date Range
d. Select specific status
- Pending – invoice has been created, but transaction has not processed. This will be created 72 hours prior to payment due date
- Overdue
- Paid
- Failed – note: failed payments will be retried 5 times
- Cancelled – note: subscriptions cannot be canceled within 72 hours of the scheduled payment
- Expired – the last payment in a subscription has completed.
Note: Entries with circular arrows indicate recurring payments v. single invoices.
View the payment history of a single customer
Select and click into the specific plan to view the customer subscriptions within the plan. Click on the three dots and select “View Invoices”.
Note: Invoices will not show for merchants with subscriptions scheduled within 72 hours of the migration.
Note: Individual payments submitted as part of a payment plan will be included in transactions listed in the Transactions tab, but if you want to specifically view recurring payments you will need to view them from the Invoice tab.
Note: The optional Payeezy fields Reference Number, Customer Reference Number and Reference Number 3 will populate into the Clover field “Note for Item or Service”, with each of the Payeezy fields separated by a pipe (“ | ”), and is viewable under the customer information for each subscription.
When an invoice is paid, you will be able to view the Payment ID on the Invoice Details page as well as on the Transaction Details page.

Note: Coming soon: The optional Payeezy fields Reference Number, Customer Reference Number and Reference Number 3 will be migrated into the Clover field “Note for Item or Service”, which each of the Payeezy fields separated by a pipe (“ | ”).
The experience that your customers have today when checking out using the hosted payment page will remain unchanged for migrated Merchant IDs, with the one exception that CVV and Zip Code are required.
If you have configured hosted payment pages on Payeezy, the configuration page within Clover will closely mirror the configuration page you currently have on Payeezy. You can access/update configurations via Account & Setup -> eCommerce -> Payments Links. Account & Setup can be accessed via the Account & Setup app on the lefthand side of the Clover dashboard or via the settings gear on the upper righthand side. For Dashboard 3 scroll down to view all settings to View all settings.
Please note: Clover hosted checkout only supports US English, Canadian English and Canadian French.
Please note: the Reference Number/Order Number field in Payeezy maps to the Invoice# on Clover.
Employees that had accounts in Payeezy and had a valid, unique email address on their Payeezy record will be converted to Clover and will receive a welcome email to activate their account.
If an employee did not receive an email, first validate that they were successfully converted into Clover.
- Within the Clover Dashboard select the Employees link from the left-hand menu.
- Search for the employee’s name.
- Validate that email address is correct.
If the employee email address is incorrect, you will need to delete the incorrect Employee and add them back with the correct email address.
If the employee email address is correct, have then check their spam or deleted emails. If they cannot find their welcome email they can go to Clover.com and click on “Access your account” under “New user or forgot your password”.
The following employee table provides the Payeezy roles and the corresponding Clover roles.
Payeezy Role | Clover Role |
Merchant Admin | PZY_Admin |
Merchant | PZY_Merchant |
POS | PZY_POS |
Read Only | PZY_Read Only |
The permissions assigned to each of the Clover roles are generally the same permissions as are offered in Payeezy. When there is a difference in functionality between the two systems, the Clover roles are mapped as closely as possible to Payeezy roles. The following example shows differences in the permissions.
If a user has permission to access reports on Payeezy, the user will also be granted permission to access reports on Clover. However, Clover has a much richer report offering. The business owner may opt to remove access to certain reports for some users. Clover encourages business owners to review their employee permissions to determine if you want to make changes.
If an employee was not successfully converted to Clover, you will need to add them manually. To add new employee, select the Add New Employee link at the top of the Employees page. Ensure the email address is unique to the employee.
If you need to recreate an account, delete the employee account, and follow instructions to add a new account.
For new employees, in addition to the Payeezy roles, you will also be able to select from the standard Clover roles (Admin, Employee, Manager).
Once added they will receive a welcome email to activate their account.
Clover supports the all the fraud filters and fraud support functionality that Payeezy provides as well as additional features not available on Payeezy. Your existing Payeezy fraud settings will be carried over to Clover.
Please note that the Clover fraud prevention tools allow you to automatically void suspicious non-device payments taken from Virtual Terminal and the ecommerce API.
Example: If an invalid CVV is sent to the issuer, the issuer may still approve the transaction but flag that CVV failed. If the fraud setting “CVV does not match (when provided)” is turned on, when Clover receives this response from the issuer, the transaction will be automatically voided.
Please note: your Clover fraud settings may be tighter than what you have experienced on Payeezy. Implementation of fraud settings are highly recommended to help reduce fraud and retain chargeback rights. Please review the settings on your Clover accounts.
Below is an overview of the fraud filters that are available on each system. Fraud filters can be found on
- Dashboard 2: Account & Setup -> Ecommerce -> Fraud Filters
- Dashboard 3: Settings Gear on the top right -> View all settings -> Ecommerce -> Fraud Filters
Fraud Filter | Payeezy location | Clover location |
General Note: | Fraud filters can be set within the Terminal Section under the Administration Link | Fraud filters can be set under the Account & Setup link |
AVS | Available | Available Zip Code is Optional for API for all Payeezy MIDs upgraded to Clover and Required for API for MIDs added to Clover post-upgrade Required for MOTO and Hosted Checkout |
Card Security Code Required CVV2/CVVX2/4DBC | Available Optional for MOTO, API and Hosted Checkout | Available Optional for API for all Payeezy MIDs upgraded to Clover Required for MOTO and Hosted Checkout |
3D Secure | Available | Available |
Duplicate Transaction Checking in eCommerce | Available
| Available
|
CAPTCHA/reCAPTCHA | Available | Available |
Restrictions (Positive/Negative lists)
| Available | Available
Note for merchants that had Restrictions configured on Payeezy: Card data is encrypted on Payeezy and to decrypt and identify the actual card numbers for conversion to Clover, a transaction must have been made on Payeezy using that card number in the past two years. Cards that you configured for a negative/positive rule list that were not processed on Payeezy during that time will not be decrypted and converted to Clover. |
Velocity Filters by
| Available | Available
Note: there is a default of 20 transactions per card per 24 hours. |
Sale Amount Minimum/ Maximum Threshold | Available | Available |
Credit Amount Minimum/ Maximum Threshold | Available | Available |
Other fraud settings include:
Fraud Filter | Payeezy location | Clover location |
3D Secure | Available for Hosted Checkout | Available for Hosted Checkout |
CAPTCHA/reCAPTCHA | Available for Hosted Checkout | Available for Hosted Checkout |
Fraud Risk Scoring | Not Available | Will be available at a future date |
Back testing of setting changes | Not Available | Available |
Restriction of email domains | Not Available | Available |
Support for reviewing and decisioning transactions | Not Available | Will be available at a future date |
Function | Payeezy | Clover |
Changing your business address and phone | Under the Administration tab, select the Address sub-tab and edit your address and phone number.
Note: Changes to address and phone in Payeezy do not carry to North Merchant Master. If you change your business address/location or phone number, please contact customer service. | On Dashboard 2: Select Account & Setup either from the menu on the left-hand side of the Clover dashboard or by selecting Account from the upper right-hand side of the dashboard. Select Business Information from About Your Business to edit your address and phone number.
On Dashboard 3: Select the Settings Gear on the top right -> Business Information
Note: Changes to address and phone in Clover do not carry to North Merchant Master. If you change your business address/location or phone number, please contact customer service. |
Clover offers two types of reporting:
- Transaction reports that provide detail information of all transactions processed on Clover (approved and denied)
- Summary reports that provide data to help you run your business
You can select the desired type of reporting from the menu on the left-hand side of the Clover dashboard.
Summary reports are accessed by clicking on the Reporting link on the left-hand side of the Clover dashboard and selecting the desired report. The default report is Sales Overview.
The following is a mapping of Payeezy reports to Clover reports. These reports can be downloaded into a .csv file or printed. A full list of Clover reports is included in the Appendix.
| Payeezy Report | Clover Report |
Activity Report | Sales Report Sales by Tender and Card Type |
Declined | Can filter for failed payments in Transactions application |
Fraudulent | Can filter for failed payment in Transaction Application and can view fraud reason code |
Deposits Closed
Deposits Open | Deposits report – includes all settled activity.
Merchants can view the daily transaction reports to see transactions that have not yet settled |
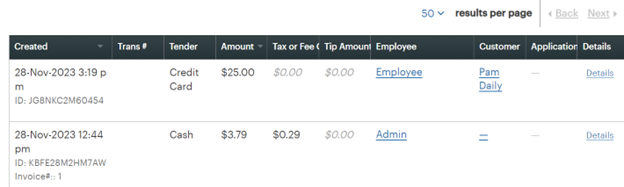
Transaction details are accessed by clicking on the Transactions link on the left-hand side of the Clover dashboard and selecting the desired subset of transactions. The default is Payments. Please see Search for a Transaction for more information.
This section is applicable to merchants that are currently accessing Client Line.
Merchants that are currently using Client Line will be provided access to Client Line Expert (CLX). Depending on the date of your upgrade, you may be migrated from Client Line to CLX prior to or after your upgrade to Clover.
Please note that all functionality available in Client Line/CLX either is or will be available in Clover. Over time you find that you no longer have the need to access multiple systems to run your business and you will be able to do everything from within Clover.
Payeezy provides non-payment APIs that allow you to export summary reporting or transaction details into your system for use in backend tools. Due to security reasons these APIs cannot be supported in Clover. If you are using these APIs you have two options when you are upgraded to Clover.
- Code to one or more of the Clover transaction APIs. Please see the FAQs for more information on coding to Clover APIs
- Download transactions into a .csv file
Sometimes cardholders dispute a charge or inquire about a specific transaction. It is important that you take some action as soon as possible when this occurs. If you do not respond to the dispute before it expires you will not only lose the money for the purchase, but repeated, unresolved disputes could impact your business credit score.
Function | Payeezy | Clover |
Respond to a dispute | For merchants that have access, disputes can be processed via Business Track Merchants that do not have access to Business Track disputes are processed manually | Disputes are processed via Clover. If you have elected to receive disputes notifications, in the dispute message email, select Accept or Challenge. If you select Accept, you are done. If you did not elect to receive dispute notifications, or you select Challenge, log into your Clover account. Navigate to the Disputes link in the menu on the left-hand side of the dashboard and find the dispute you want to respond to. If you have not already responded to the email notification select Awaiting Action to view dispute details and select a decision
a. Select the type of documentation you will submit to support your challenge and select the files to upload Select Submit |
Respond to a Transaction Inquiry/ Copy Request | For merchants that have access, Transaction Inquiries can be processed via Business Track Merchants that do not have access to Business Track Transaction Inquiries are processed manually | Transaction Inquiries are processed via Clover. If you have elected to receive disputes notifications, in the dispute message email, select Accept or Challenge. When prompted log into your Clover account. Navigate to the Disputes link in the menu on the left-hand side of the dashboard and find the dispute you want to respond On the Disputes page a. Select the type of documentation you will submit to support your challenge and select the files to upload b. Select Submit |
All your Clover reports are available by selecting the Reporting tab on the left. Click on Tour on the upper right for a full description of each report.
The following is a summary of all available Clover reports. Depending on your setup, not all reports will be available to you.
Report Name | Function |
Sales Overview Report | Provides a quick over of your business |
Tender & Card Types | Provides an overview of purchases made by each card type (e.g. Visa, Mastercard) |
Item Sales | Summary of items sold, to help you identify the items that sell the most and are most profitable |
Removed Items | See which items were removed from orders after someone entered the item but before the sale occurred |
Employees | Provides a summary of employee activities during a specified time period |
Discounts | Shows discounts applied to items and orders for complete transactions during the specified time |
Taxes | Shows Taxes collected, refunded, and netted |
Gift Cards | Shows gift card activations during the specified time |
Deposits | Shows deposited for all debit and credit card transactions during the specified time |
Requested Reports | A special request can be submitted for Clover to run a report on your behalf for transactions more than 93 days old |